Thursday, December 23, 2010

My Mom's Rocky Road


I have had lots of rocky road candy but this is the only one I like. And Robocop agrees. He says to me "I don't bother eating anyone else's anymore." There are a few things that make this rocky road the best - a sweet and salty combo-- so I'd follow the recipe to the T the first time.
Growing up Mom made lots of this...some with peanuts, some with cashews, sometimes walnuts.
Ingredients:
12 oz PKG SEMI-SWEET Chocolate Chips
14oz Can Sweetened Condensed Milk
2 TBL BUTTER (real butter - not margarine)
1 JAR Planters dry roasted peanuts (salted) This is roughly 2 cups
10 oz PKG Mini Marshmallows
  1. Butter a 13x9 pan. I recommend using real butter not nonstick or margarine.
  2. Melt chocolate, condensed milk and butter over low heat in a pan.
  3. Stir continuously to avoid scalding.
  4. In a large bowl combine marshmallows and peanuts.
  5. Pour chocolate mixture over the nuts and marshmallows and mix well with a spoon.
  6. Spread in your buttered pan. Lay wax paper on top and mush down.
  7. Cover with wax paper and saran wrap
  8. Chill 2 hours.

ENJOY! The secret to this is the salted nuts, semi sweet chocolate, and the butter. This gives just the right combo of sweet and salty.

Tuesday, December 21, 2010

Homemade Girl Scout Thin Mint Cookies


This recipe is very easy and inexpensive and mimics those wonderfully yummy Girl Scout Thin Mints.

And I'll apologize now for the photos! They were taken with an iphone!

1 BOX of Ritz Crackers
Chocolate of Choice (2-4 squares (or 2 -4 oz)of Almond Bark or Dove Baking Chocolate)
1/4 TSP Peppermint Oil (NOT peppermint extract)
Decorations (In this post I used candy pearls)
Wax Paper
Baking Sheet
Lay your wax paper on a cookie sheet. Melt chocolate. There are lots of ways to melt chocolate. I use a double boiler for my main dipping "background" chocolate and microwave method for my decorative chocolate. Start with 2 oz at a time and add more if you need it less pepperminty.

Dip half of the Ritz cracker in the melted chocolate and tap excess chocolate off very carefully. I dip the front and usually do not worry about dipping the back. That's my personal preference but if you like more chocolate then by all means dunk the entire thing.
Lay them on your wax paper. After dipping, you'll want to decorate while they are still a little melty. Is that a word? Almond bark sets up very quickly so if you use that you may want to dip a few and decorate those before moving on.
For the decorative white I placed a square of almond bark in a freezer bag, microwaved 30 seconds and mushed the bag to make sure it was melted. Mine was melty and perfect. If yours is not then microwave in 20 second intervals. Cut the very tip of the bag and start piping the white chocolate in quick motions back and forth across the cookie. You can also use a piping bag or melt this in a glass container and then put it in the bag...again, a preference thing.

I like to do dark chocolate, milk and white chocolate and decorate them all differently. It makes such a fun little gift. Here they are:
These are white on white w/ candy pearls placed in the swirliest section.
To set any of these up quickly pop them in the freezer for a few minutes before wrapping.


VOILA! Cute. Easy.


Saturday, October 30, 2010

Crockpot Potato Soup

I took a recipe from Fix it and Forget it and made it my own. Not on purpose, mainly because I thought I had all the ingredients and didn't so I had to adapt it and it turned out pretty good! You can also add more or less of something and completely omit something and I have found that it turns out different but still pretty good. I try to make mine w/ the least amount of dairy as possibly since I'm dairy intolerant! This is an inexpensive soup to make.

3 Potato, peeled and cubed
1 Cup Instant Mashed Potatoes
2 Leeks, chopped
1 onion, chopped
1 clove garlic, chopped (or 1 TSP of Garlic Garlic)
4 chicken bouillon cubes
1 TB Dried Parsley
5 Cups Water
3 TB Butter
1 PKT Lipton Cream of Chicken Soup Mix, Cup of Soup (this can be omitted if you need to but it helps add to the creaminess without adding cream, milk or evaporated milk)

1. Combine all ingredients in a crock pot.
2. Cover. Cook on Low 10-12 hours, or High 3-4 hours.
3. Garnish with chives

Variations: I've added ham or bacon to this. If you want a creamier potato soup then you will add in a cup or so of milk in the last hour of cooking.

Freezer Meal Directions: This freezes up nicely. You can cook it then freeze it or you can prep all the ingredients and quickly bag and freeze it. You do not need to add the water until you cook it. DO NOT let it thaw before cooking. Simply place the frozen items in a crock pot with the 5 Cups of water. If you thaw it your potatoes will turn black!

Blog Background

I cannot figure out what happened to my blog background from the cutest blog on the block and tried several times to download a new cute one. So I had to pick from one of the templates on blogger. I'm not sure what is going on so bare with me until I figure out how to get my blog looking normal again.

Thursday, August 5, 2010

The Cup Corset- UPDATE


I am so excited to share my new business adventure with my friend and partner Karalee. We are making and selling Cup Corsets. However, ours are unique, they have a handle! And if you have not ever had a coffee cozy with a handle you will wonder what you ever did with out one. You can check them out here at our other blog www.thecupcorset.com. They fit on most tapered cups that you would find at a coffee shop or restaurant. And we also carry those snazzy acrylic cups you see in the picture here.
The Cup Corset is available with or without a strap so that you can hold your drink or personalized pint of ice cream and not burn or freeze your little fingers.

Find us on Facebook by searching for The Cup Corset. Orders can be emailed to thecupcorset@yahoo.com or with a click of a button at www.thecupcorset.etsy.com. There are many pictures on our facebook and website. At this time all of those are available and we have some others as well. If you are looking for something specific, let us know.
Business has been taking off and it truely has been such a blessing. Thank you everyone who has checked out our product. We have truely been blessed.

Friday, July 2, 2010

Bacon Wrapped Sutffed Jalapeno Peppers

So I guess I just posted the dairy free version...here is the regular version adapted from Pioneer Woman's recipe. I've made a few changes for what works for me. I've made them both ways and they are all good. I don't think you can mess them up.

18 Jalapenos, sliced and cleaned out (see note on how to clean them below)
1 PKG Bacon
1 BLOCK (8oz) Cream Cheese
1/2 CUP Cheddar Cheese, Shredded
2 TBL Tastefully Simple Onion Onion (or chopped chives or green onion)

Blend Cream Cheese, Cheddar Cheese, and Onion Onion together. Cut bacon in half for large jalapenos or in 1/3rds for small jalapenos.

**Make sure your jalapenos are sliced in half and cleaned out. I highly recommend using gloves of some sort (latex or even plastic bags). If you like hot jalapenos then leave some of the seeds and/or membranes in tact. The membrane is the white part. If you do not like heat then clean all of that out really well with a teaspoon.

Fill the jalapenos with the cream cheese mixture. Wrap bacon around the jalapeno. If I have toothpicks on hand I will secure the bacon but it's not required if your bacon is long enough it should not fall off. Place on a baking pan or stone.

Brush BBQ sauce on top of each jalapeno. Bake 350 for 30- 40 minutes or until bacon is crisp.

I have been impatient before and broiled them for a few minutes to crisp that bacon up. I have cooked them at 275 for an hour like Pioneer Woman. But mine came out mushy when I did that. So experiment with them and see what you like. I prefer my jalapeno to hold up and cooking them hotter faster seemed to do that for me. Either way they tasted delicious and it was hard not to eat 10 of them!

Tuesday, June 22, 2010

Thankful

I've never posted this on my blog but it might give you insight into why I put many posts on and then I'll go a few weeks without anything. I'm sure many of you aren't even interested in this story so you can just scroll down to the more interesting things on the blog.


Before my life changed in Feb 2008, I was relatively healthy, losing baby weight and working out 6 days a week. Enjoying my kids and had a very busy schedule. Maybe even a little OCD.


I remember when the sickness started. At first I thought I over did it in the gym. I had pain in my calves that felt similar to a shin splint. The following week the pain did not go away it spread to my thighs, and then the following week it moved up to my hips and back. I became very ill, so ill I couldn't function. It hurt to sit, I had to pace often, I had tingling up my spine, face, and arms which clearly read neurological all over it. Every time I sat (including driving) I would all of the sudden feel like I was going to throw up. Some of the other symptoms included trouble swallowing, sore lymphnodes, extremely high blood pressure (as in high enough to go into cardiac arrest), I felt like I couldn't feel my legs or toes even though I could still walk. I also began the life of twitching and spasms (which are two different things in my book). I was on pain medication and I didn't even know what was causing the pain.


After many specialists who would diagnose or tell me what they thought was going on because it wasn't showing up on any test I refused to take any more pain medication or any other medication for that matter until they figured things out. I felt like this was the end of the road for me and that I was going to die. I felt poisoned.


Months went by. The doctors changed their diagnoses several times and 5 months later my more painful symptoms finally started to slowly leave. I would wake up and not have the throwing up one day, then wake up a week later and my lymphnodes felt better, and so on. That went on for a few more months.


I am thankful God healed that part of my sickness. It did leave me with extreme muscle pain, fatigue, muscle spasms and twitches and some other problems. It's like whatever happened triggered some things in my body. One Doctor re-diagnosed me with Fibromyalgia, another with Chronic Widespread Pain and after going to the Fibro clinic in Portland it's clear that even though I have many symptoms it's not Fibro. They do think it's something neurological.


I have also seen a naturpath and it seems like some of what is going on now is digestive related. I don't know if any of that caused my earlier symptoms or if its the other way around. Whether or not I'll ever feel "normal" again I have no idea. I am still trying to find an answer. Some days are better than others. But on my good days I would say that it's probably about a 5 or a 7 for a normal person. 20 minutes of exercise puts me into a downward spiral.

But God is good. He allowed me to live and be a mommy. I am so thankful even on my hard days that I'm a mom. It's much tougher now to be the mom I want to be than it was 2 years ago. I had the drive and energy just needed to lose the weight. Now I'm way out of shape, have little energy and sometimes don't feel good enough for these two little boys I have but I refuse to just totally give up. I keep busy throughout the day because if I slow down my muscles stop working right.

I am thankful for good insurance that pays for most of my treatments.

I am thankful for good friends that got us through those tough months, Robocop (my husband), and old and new friends who get us through the rough days now. And I'm thankful for two very energetic boys who remind me about what life is really about. And, to not take it all so seriously all the time. I'm still learning....

Saturday, May 29, 2010

Piping Icing

My friend Karalee made some cupcakes for the potluck and I frosted. I think piping is getting easier and easier and these turned out too cute not to share! And she's a better picture taker than I am so I had her snap these photos. Here are closeups.

To get the raised middle, you pipe a small a small amount in the center first and then pipe around the cupcake starting w/the outside.

These were my favorites. So cute and fun. For these you pipe a star in the middle and then you just do this all around the cupcake. This seemed to be everyone's favorite.
We couldn't find all her piping gear so we used a ziploc bag, cut a small hole on the end and put the tip inside and taped the outside of the tip to the bag. It worked just fine.
When piping frosting I notice you just need to have a steady hand and consistant pressure. I love how these turned out and will probably never "frost" a cupcake again using just a knife.


Monday, May 17, 2010

Small Grown Up


I was listening to my 5 and 6 year old boys play. Since I've read Dr. Seuss I've always just called them little boy 1 and little boy 2. Annnnyyywayyy....The conversation went like this:

Little boy 2(5 years old): No, you can do that. You have to have a grown up to do that. Here, let me do it.

Little boy 1 (6 years old): Your not a grownup.

Little boy 2: I'm a small grownup.

Well, that explains it all!

Monday, May 10, 2010

Rainbow Cupcakes

Okay I thought I had these on my blog and just told someone to go look at them and guess what? They were not there, they were on my facebook page though... so
here they are:

I totally cheated using Betty Crocker's white cake mix and then divided the mix into equal parts and colored the mix with bright food coloring. Then you simply layer them into the cupcake liner. I frosted them using Betty Crocker's Cream Cheese Frosting w/a lot of food coloring in them because I wanted that bright color for my little guys 5th bday. These were fairly easy but they did take a lot of dishes and a lot more time than I thought they would take.

YUM


For frosting I piped it on there with Tupperware's squishy accordion thingy. I don't know what it's called but basically it's to pipe frosting on. It worked okay, although you can tell when it was almost empty on the ones in the back it was hard to get a nice full frosting look. It works much better very full.


Gluten Free Meetup Group

If you are looking for a gluten free "support" group there is one here in the Tri-Cities area. Here is the info.

GF Tricities- A way of life for many of us
Supporting the Tri City Area. See what we are all about!
Email Autumn Zuljevic: Glutenfreeinwastate@gmail.com

Sunday, May 9, 2010

QUICK and EASY Taco Soup


This was quick and easy taco soup. It's not my "real" recipe but for the week I didn't have a stove it was a hit and it was easy.

1 lb ground beef , cooked w/taco season
(We had made up tacos before my stove died and so we just used the left over meat from that)
1 can red kidney beans
1 can corn
1 can diced tomatoes
1 can tomato sauce
1 small diced onion
Taco fixins
tomato, sour cream, cilantro, cheese, chips, whatever else you put on your tacos
Dump everything but the taco fixins in the crock pot. Cook on low 6-8 hours or high 4-6 hours. Give or take a few. It really just needs heated through. You could omit the onion and/or put it on top of the soup w/the other taco fixins.

This was super simple and didn't require much cooking. I call it my cheating taco soup recipe.

TO FREEZE: Put all ingredients into a freezer bag instead of crock pot. Cook the ground beef and add it in there. TO REHEAT: Place in crock pot or on the stove top in a pan.

Wednesday, April 28, 2010

Gluten Free Dairy Free Stuffed Bacon Wrapped Jalapenos


NOTE: Rice cheese (Aromatic brand) has casein in it. Which is a milk protein. So, read your labels if you need it to be 100% dairy free. Try almond or soy cheese. Or no cheese at all. Some can tolerate a small amount of casein but not milk.

Could the name get any longer? But I'm hear to tell you they are worth every bit of stuttering over their title. These were last nights an experiment while entertaining and the original recipe is adapted from Pioneer Woman's recipe only this is dairy free. Yes, they actually are good! So good that I had a few people try them and say they couldn't tell the difference, much. Maybe not quite as rich but they are still pretty yummo.

1 Tub or 8 oz of Toffuttis better than Cream Cheese. This is fairly soft already because it's not a block of cheese it's in a tub
1 PKG or 8 oz Rice Cheese. I used mozzarella because that is what I had
1 PKG Bacon
1 DZN or so Jalapenos
1/2 CUP BBQ Sauce (make sure it's gluten free)

Optional: chives, green onion or I used a couple dashes of Tastefully Simple's Onion Onion

  1. Slice Jalapenos in half.

  2. De-seed Jalapenos and wash. Let them dry a little while you get the cream cheese prepped. Recommend using gloves and try not to choke from the fumes. These are almost worse than onions!

  3. Mix Tofutti Cream Cheese and Rice Cheese and any of the optional items in.

  4. Stuff the peppers. There's no science to it just put the mix into these babies.

  5. Wrap with 1/2 slice of bacon. Or if your jalapenos are real small cut your bacon into thirds.

  6. Brush with a little BBQ sauce. I find this is also optional but it really helps that bacon to caramelize and taste goooooood. Here is a before picture.

7. Bake 350 for 30 minutes. This is where pioneer woman and I do it different...She cooks lower temp for longer. I have tried it both ways and they all taste good. I'm inpatient and want them sooner and they've always turned out.

Enjoy! And try not to eat them all in one whack because it's truly difficult.

Saturday, April 10, 2010

Blog Re-name?

So I'm thinking about opening up a 2ND blog...one that has just my recipes, crafts, etc. so I can keep my family stuff separate. Or maybe just renaming to a catchier name. I need help figuring out a good name. Of course, the only ones I came up with may only make sense to the ones who know me but if you vote or think of something even cuter let me know! Here are the ones I came up with that aren't so...cute but hey, it was like 1am when I was thinking these up...I am one of those who can't sleep til I've got the idea down at least on paper...good idea or not. And then of course, after picking I need to figure out if the name is available.

1- Mamacop (or something along these lines) My husband is a cop and I used to work in the jail. So this is funny mostly to me and him. But I think others would get the hang of it. This would go along nicely with the someday coffee shop that my husband and I want to open up called "Latte Enforcement." Okay I know corny but you should of heard the funny things coming out of our mouth the other day on our date. "you have the right to a double shot, anything you say can and will order you up a coffee"...Okay okay already I know you are rolling your eyes.

2- Balancing Boys Anyone who has boys knows this is truly a feet.

3- Balancing? boys, business and baking There could be many other "b" subtitles to this.

3- Cherylene's I like the simplicity of this.

Or maybe all of these should just be subtitles under my original blog name. I just thought it would be fun to have something a little more catchy. Votes? I'd love to hear them or do you have something more fun to encapsulate all that I do. And my blog is new. I thought it would be easier to move things over while it was still new.

Sunday, April 4, 2010

Chore Cans


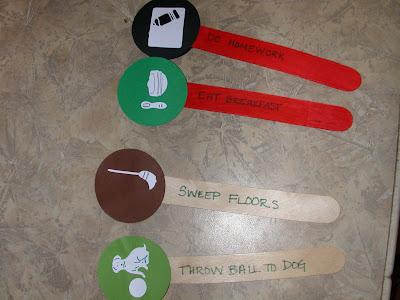
I'm so excited about these "chore charts" for my little guys. I got the idea at Make It Sparkly Mama . Instead of having a "list" on another piece of paper that I will lose or forget is on the fridge these are out and tangible and easy for them to "check" off what they've done.

You'll notice two colors on the background paper of the sticks. One is for AM chores (above it's in green) needing to be done before school and the other is for PM chores (above in black) to be done after school until bedtime. My kids are little so yes, I still need to remind them to eat breakfast and put on their shoes etc....but ultimately I could just have a stick that says "get ready for school" and it could encapsulate them all. When they've completed their chore, they move the stick over to the "done" jar.
I really want to make some optional star shaped or bright red sticks that help them to remember to be helpful to each other. Maybe something that says "Do something nice for your brother today" or "Hug your brother." Mine are so close in age they can use the gentle reminder one way or another.

Below are some close ups of the sticks. I've also written on them what the task is for my budding readers. The picture is nice for little ones who can't read or are very visual. These brown and green are for my oldest and the black and green w/red sticks are for my youngest.

These designs were cut on a cricut but you could just draw pictures, print them out on the computer, or cut them out of a magazine and they would work just fine. I modge podged them to the paper and then used glue dots to glue them to the stick.


Both kids have a set of jars that are decorated differently so they can tell them apart. Here are my youngest sons. His are done in sports theme. I wanted to cut out "to do" and "done" on the cricut but ran out of time and will probably add that later when I have more time. Then I will not need the little tags hanging down.


For the first few days I told them if they had all of their chores done and sticks moved over to the done side that they would get some sort of treat. A piece of gum or 25cents would do the trick! Love it when they are little and so easy to please.
Enjoy! Oh and I did these from left over Tastefully Simple Jam Jars which clean up beautifully. I modged podged the sports one but the other one I didn't I just wrapped it and used the modge podge to glue the edges together.
I had very cute paper picked out but the boys didn't like it and they wanted to pick their own paper so camo and sports is what it ended up being. Love this idea...Thank you Make it Sparkly Mama! She has some great ideas....check her out.


Layered Jello Squares

mmmm.....jello.....
Now that I got your attention...
Don't mind the mess on my kitchen island...which is my workstation for all things craft and cooking....so it pretty much looks like this all the time.

Here is the recipe for my layered jello squares. I had two recipes and didn't have the stuff for 1 recipe and the other had mixed reviews so I put them together and made my own. They set up nicely and got rave family reviews.
You'll need:

2 SM PKGS Lime Jello or 1 LG
2 SM PKGS Orange Jello or 1 LG
2 SM PKGS Red Jello or 1 LG
2 Envelopes Knox Unflavored Gelatin or 1 Envelope + 1 SM PKG Lemon Jello
1 CUP Sour Cream (Lite works)
7 CUPS Water

  1. Grease 9x13 pan with nonstick. Wipe excess off with a paper towel.

  2. Whisk 2 boxes of lime jello with 2 Cup Boiling Water. Place in the 9x13 pan and place pan in the refrigerator. Make sure it's level and let set for 30-45 minutes.

  3. While Green Layer is setting, begin making your white layer. It's important to start the next layer as soon as your current layer is setting so that it can cool down in time to be poured on w/out melting the last layer.


  4. Whisk 2 Knox unflavored gelatin or 1 Knox and 1 Lemon with 1 Cup boiling water. Then add the sour cream.


  5. As soon as the green layer is set, gently pour 1/2 of the white layer on top and let set another 30 minutes. Immediately begin making your orange layer.


  6. Whisk 2 Boxes of Orange Jello with 2 Cups boiling water. As soon as the white layer is set and your Orange mix has cooled just enough, pour gently on top of white layer and let set 30-45 minutes.


  7. Begin Making your Red Layer. Whisk 2 boxes of Red Jello w/2 Cups Boiling water and let set. Also reheat your white layer for about 20 seconds in the microwave so that you can easily pour it. If it is lumpy it will not pour well and it's difficult to flatten out.


  8. Pour the remaining white layer on top of the orange and let set for 30 minutes.


  9. Pour the last layer of red down and let set.


  10. Once totally set, you can slice into cubes and serve.

Notes:


  • I used sugar free jello and lite sour cream.


  • Set up times are approximate. You may get away with shortening the time but it's important that it's set up enough between layers so that the layers do not mix. You can test this by touching it lightly. It should just be a little sticky not watery.


  • And begin making your next layer as soon as you put the jello back in the fridge to set up.


  • You can of course use any color!

Tuesday, March 30, 2010

Tea Holders


I made these cute tea holders for 2 reasons. First, if you look in my purse, there is always a bag of tea...heaven forbid I get somewhere and they not have tea for me to drink. And second, I needed to make a quick cute gift for my MOPs table. These were fun and turned out adorable. I originally saw these on Lolly Chops. Click here to see her version. She also has a link to a fabric made one. Cute cute cute. She has a pattern you can download there and you can also view the fabric ones from her website. The one on the left shows what it looks like inside and here is a close up:


These were lots of fun for our February meeting and you could do these in any color for any month. Or put chocolate in them. Tuck them in your purse and you have a cute tea/chocolate holder for just in case.
Note: Okay so the pictures aren't the best but the colors are pink, brown, and cream. They are way cuter in person than in picture. I'll try to get some better pics.


Wednesday, March 24, 2010

Life as a Mom

Okay, so I'm looking at my blog and realized I have not posted much lately. So, be patient, I'm working on it. It's just been such a busy month and I don't need to tell you that because all moms are busy....right?

There is this myth that if you are a stay at home mom that you are actually home. HA HA HA! Who titled us stay at home mom's anyway? My new title is Chief Home Officer. I like it...or do you have a better one? I just know some days I feel like a CEO and some days I feel like an administrative assistant but I'm highly underpaid and overworked.

Between MOPS (Mother's of Preschoolers), Volunteering at the school, baseball (this year is my first with being an assistant to the coaches with my fabulous friend Karalee), soccer, bible study, housework, dog, 2 boys, babysitting, husband (or should I say 3rd child), scheduling appointments, reinventing cooking as I knew it to gluten free, oh and running a business....I'm not complaining but something has to give...so the housework has really given and the blog writing has also taken a back seat.

But stay tuned, I have some cute things to post as soon as they get done and I get pictures of them up! I can't wait to show you. I will have my chore chart pics up, I will also have my scrapbook tea holders to post and, my Velcro Mr. Potato Head. Okay, those will all make more sense when you see them.....I promise!

Monday, March 15, 2010

Crockpot Salsa Chicken

I love it when dinner turns out to be good and it was by accident. Here is what we did tonight and got rave reviews all around. Even my husband who claims to hate chicken ate a good size portion.

What you need:
4 - 6 Boneless Skinless Rinsed Chicken Breast (Mine were frozen--straight from freezer)
8 oz Salsa (I had about 1/2 a jar of Pace Picante)
1/2 Cup Shredded Pepper Jack and Cheddar Cheese Combined

1. Place chicken in crockpot and pour salsa on top.
2. Cook on high 4-6 hours or until chicken is fork tender and easily shreds.
3. Once the chicken is done, carefully place cheese on top of chicken place lid on top let melt. This took about 5 minues.

I served this with Spanish rice (out of the box-Zataran's brand), sour cream, corn and, jalapeno poppers. Recipe for poppers to follow. Oh and I used the left over poppers mix and through it in the crockpot last minute to make a thicker creamier sauce. But you wouldn't have to do this. This was an afterthought after we started eating.

Jalapeno Poppers

Okay, so I really cheated on these. I have a recipe for them that is pretty easy from The Pioneer Woman but I didn't have all the ingredients for them. I had about 2oz of cream cheese, 4 jalapenos, and cut up a few slices of pepper jack and cheddar cheese.

Slice Jalapenos in half and clean out. Mix cream cheese w/the pepper jack and cheddar. Place inside the halved jalapenos and bake 350 for 30 minutes. They were super easy and delicous. I topped them with a little sour cream after..heck why not add a little more cream?

Note: This meal was completely gluten free. I checked and double checked the rice and couldn't find gluten in it. So, I recommend checking your spanish rice and even your salsa if it's out of a box before just taking my word for it. And of course, if you use blended cheeses you need to check as well because sometimes the already shredded blended cheeses have gluten in them.

This would be a fabulous freezer meal! Just place chicken and salsa in a bag for later. I would shred the cheese and place in another bag so that you had it ready to roll.

Friday, March 12, 2010

Painting With Water? (Ages 1-7)

I'm the first to admit that there are times my kids just need to be busy and let me get things done. We've used this activity since they were old enough to walk. And in our house that was very early (9 months). And I don't really what age this becomes uninteresting for them because my 6 1/2 year old still loves it!

What you need: a paint brush (any kind), a bucket or bowl, water. That's it!

Send them outside and have them paint the house, the fence, the concrete, their bikes, whatever they want. Afterall, it's just water and probably can't hurt much. Make sure you explain to them what is off limits. Like my car is offlimits to the kids "painting." I don't want hand marks all over my windows should they reach that high.

My favorite is when they paint the concrete. It changes color when water hits it so they really think they are painting :). Try it! It really works.

Friday, February 19, 2010

Wheat Free Shortcake

I made this recipe adapted from Bobsredmill.com. The only thing I changed was on half of them I put jam inside and folded them over and they tasted sort of like a scone. The texture of wheat free/gluten free products are usually a little grittier but this was pretty good.

2 1/2 Cups Gluten Free Baking Mix (I used Bob's Red Mill)
2 TB Sugar
1/2 Cup Butter
1/2 Cup Milk or Water (I used 2% but you could use Rice, Nut or Soy)
1 Egg, Slightly Beaten
Jam (Optional)

1. Preheat oven to 375 degrees.
2. In a bowl combine sugar and baking mix.
3. In a separate bowl combine butter, milk and egg.
4. Combine all ingredients til moist.
5. Knead 10 times on a lightly gluten free floured surface. Roll out the dough 3/4" thickness.
6. Place shortcake on greased cookie sheet and bake about 20 minutes or until golden brown.
7. Serve w/your favorite fruit and whipped topping or eat like a biscuit.

I think these could quite possible taste good as a cheese biscuit with herbs and cheddar mixed in. I will try it and if it's good I will post it.

Nutritional Information for 1 Shortcake:
190 calories, 9 grams of fat, 21 NET carbs.

Tater Tot Casserole

This recipe is one of my husbands favorites. In fact, I had never heard of it before until he taught me how to make it. There are lots of variations out there but this is the way Mikey likes it. He doesn't like it with all of the other ingredients, well, maybe once in awhile but heaven forbid anything have more flavor than the basics. Gotta love him.

1 Pound Hamburger (plain or taco style)
1 Can Cream of Mushroom Soup
1 Can Cream of Celery Soup (or substitute with Sour Cream)
1 Cup Grated Cheddar Cheese
1 Bag Tater Tots
Season Salt (I use Tastefully Simple Season Salt because it only has 380 mgs of Sodium and a little goes a long way)

1. Brown the hamburger and spread on the bottom of a 9x13 baking dish.
2. Pour both soups over the hamburger.
3. Sprinkle season salt.
4. Top with cheese.
5. Layer Tater Tots.
6. If you are freezing the meal, stop here and put it in a freezable container (preferably aluminum casserole or deep pie pan)
7. Bake 375 Degrees for 25 minutes. The cheese should be melted and the tater tots browned.

Variations: I have seen (and tasted) this made with corn, green beans, bacon and onions. I would try one add-in at a time. Again, Mikey tells me he likes it that way but also says it's too rich for him to have it that way all of the time. I on the other hand have liked it no matter how it's been fixed.
Notes: This meal freezes beautifully! When you are pulling it out of the freezer to cook you will want to let it thaw thoroughly or you will have to bake it for over an hour (sometimes 2). Placing in your refrigerator the day before usually will do the trick and bake as directed up above. If you don't have time to wait you can pop this out of the container and into a glass baking dish and then dethaw in the microwave, just make sure you have the tater tots on top.

Nutritional Information will vary depending on the type of meat, cheese or soups you use. The best way to find calorie counts is just to pop on over to calorieking.com and search for the ingredients.

Sunday, February 7, 2010

Cabbage Salsa

Delicious enough that I can eat it until I make myself sick delicious...how much cabbage should one person really eat? Moving on....

1/2 Head cabbage (Optional) or 1 bag of finely chopped cabbage
1 or 2 Large Tomatos
1/2 Large Onion
1/2 Bunch Cilantro
1 Bell Pepper Or Jalapeno (Most recipes call for Jalapeno but if you do not like spicy at all try the Bell Pepper)
1 Lime or Lime Juice
Salt and Pepper to Taste (or garlic salt in place of the salt)

Tip: I think it's good to have about equal parts of each ingredient. Unlike salsa where the tomatos take over. Depending on the size of your vegtables will depend on how much of each you need.

All ingredients need to be finely chopped or shredded. If you have a pampered chef chopper that works well or before those days I used a small food processor. I know that a Magic Bullet or Ninja Master Prep work well too! Or if all else fails and you have the knuckles for it, by all means chop away with a knife.

Mix well. I like to taste test each batch and make sure it tastes right. I don't need much salt but I know others that put a lot of salt in. Other variations I've seen are adding a tiny bit of garlic or garlic salt.

Serve with Tortilla Chips or on top of your favorite Mexican dish and enjoy! This is one of those things that is even better after it's chilled awhile and let all the flavors run together and the cabbage soften up. If you can wait that long to eat it. I know I can't. And you probably don't want to let it sit more than a day or two or it gets soggy. A good excuse to eat it in one day...but again, how much cabbage does a person need in one day?

Saturday, January 9, 2010

Napkins

So, I have little ones and one of my giant pet peeves is that they take a napkin wipe their face once, take another, wipe one hand, take another and wipe the other, etc. And the first napkin wasn't all that dirty and could of quite easily made it through the entire dinner. I know I might be the only one annoyed by this but even though that may be true I've decided to outsmart them for now. You might think this is crazy and time consuming and geez napkins aren't that expensive in the first place. But I do it anyway.

I take out only a small amount of napkins (you know the amount that would fit in your napkin holder). I unfold them once and cut them down the middle. So when they take a napkin for each body part they are really only take 1-2 napkins instead of 4. My napkins go twice as long as the next person. Kind of like when someone at the paper towel company decided to make paper towels smaller so you could take 1/2 the size of a paper towel roll because you don't always need a full amount.

And, just in case you read this and thought "wow that would take too much time out of my day" I will let you know that it took me about 5 minutes. Maybe less for my stack and I did it real quick while I was waiting for the pizza rolls to cook in the oven.

Saturday, January 2, 2010

Passing Down Recipes

The other day I was thinking how I would really of loved to have some of my Mom's favorite recipes. I have a few of her special dessert recipes but hardly any of her regular everyday dinner recipes. How on earth did she gets those pork chops just right? I've never found the exact recipe but something similar. Now that Mom has passed I don't have a way to get the information. Yes, of course, she has cookbooks and written down recipes but she has so many I have no idea where to start or what is really good. When I got married and had children I had to find recipes and ask a lot of questions. Mom was a good cook and I simply just can't compare.

I also thought how much I would love some of my Mother-In-Laws Recipes. So, this prompted me to put together a little project for my kids.

I picked up two of the "cookbook size" binders from Walmart. I will be putting together cookbooks for the kids (or their wives) of all of our favorites. So, now when I print off a recipe I print 3. One for my cookbook and one for each of theirs. This will be something I will probably pass on to them when they move out or get married. I even plan to jot down their own comments and thoughts about the meal.

If I feel creative one of these days I will scrapbook the front and slide it into the front. For now, it will just say "Ayden's Cookbook" and "Mason's Cookbook" until I have more time. I hope that this helps them (and their wives). They may not like all the recipes when they get older but this will save them some time trying to find a tried and true recipe. And I'll get to pass on some of my mom's yummy recipes too!