Wednesday, April 28, 2010

Gluten Free Dairy Free Stuffed Bacon Wrapped Jalapenos


NOTE: Rice cheese (Aromatic brand) has casein in it. Which is a milk protein. So, read your labels if you need it to be 100% dairy free. Try almond or soy cheese. Or no cheese at all. Some can tolerate a small amount of casein but not milk.

Could the name get any longer? But I'm hear to tell you they are worth every bit of stuttering over their title. These were last nights an experiment while entertaining and the original recipe is adapted from Pioneer Woman's recipe only this is dairy free. Yes, they actually are good! So good that I had a few people try them and say they couldn't tell the difference, much. Maybe not quite as rich but they are still pretty yummo.

1 Tub or 8 oz of Toffuttis better than Cream Cheese. This is fairly soft already because it's not a block of cheese it's in a tub
1 PKG or 8 oz Rice Cheese. I used mozzarella because that is what I had
1 PKG Bacon
1 DZN or so Jalapenos
1/2 CUP BBQ Sauce (make sure it's gluten free)

Optional: chives, green onion or I used a couple dashes of Tastefully Simple's Onion Onion

  1. Slice Jalapenos in half.

  2. De-seed Jalapenos and wash. Let them dry a little while you get the cream cheese prepped. Recommend using gloves and try not to choke from the fumes. These are almost worse than onions!

  3. Mix Tofutti Cream Cheese and Rice Cheese and any of the optional items in.

  4. Stuff the peppers. There's no science to it just put the mix into these babies.

  5. Wrap with 1/2 slice of bacon. Or if your jalapenos are real small cut your bacon into thirds.

  6. Brush with a little BBQ sauce. I find this is also optional but it really helps that bacon to caramelize and taste goooooood. Here is a before picture.

7. Bake 350 for 30 minutes. This is where pioneer woman and I do it different...She cooks lower temp for longer. I have tried it both ways and they all taste good. I'm inpatient and want them sooner and they've always turned out.

Enjoy! And try not to eat them all in one whack because it's truly difficult.

Saturday, April 10, 2010

Blog Re-name?

So I'm thinking about opening up a 2ND blog...one that has just my recipes, crafts, etc. so I can keep my family stuff separate. Or maybe just renaming to a catchier name. I need help figuring out a good name. Of course, the only ones I came up with may only make sense to the ones who know me but if you vote or think of something even cuter let me know! Here are the ones I came up with that aren't so...cute but hey, it was like 1am when I was thinking these up...I am one of those who can't sleep til I've got the idea down at least on paper...good idea or not. And then of course, after picking I need to figure out if the name is available.

1- Mamacop (or something along these lines) My husband is a cop and I used to work in the jail. So this is funny mostly to me and him. But I think others would get the hang of it. This would go along nicely with the someday coffee shop that my husband and I want to open up called "Latte Enforcement." Okay I know corny but you should of heard the funny things coming out of our mouth the other day on our date. "you have the right to a double shot, anything you say can and will order you up a coffee"...Okay okay already I know you are rolling your eyes.

2- Balancing Boys Anyone who has boys knows this is truly a feet.

3- Balancing? boys, business and baking There could be many other "b" subtitles to this.

3- Cherylene's I like the simplicity of this.

Or maybe all of these should just be subtitles under my original blog name. I just thought it would be fun to have something a little more catchy. Votes? I'd love to hear them or do you have something more fun to encapsulate all that I do. And my blog is new. I thought it would be easier to move things over while it was still new.

Sunday, April 4, 2010

Chore Cans


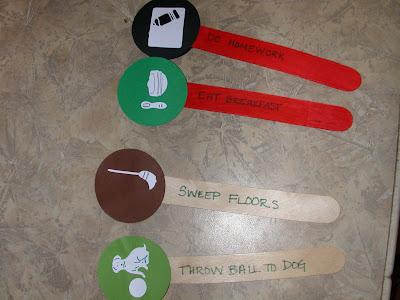
I'm so excited about these "chore charts" for my little guys. I got the idea at Make It Sparkly Mama . Instead of having a "list" on another piece of paper that I will lose or forget is on the fridge these are out and tangible and easy for them to "check" off what they've done.

You'll notice two colors on the background paper of the sticks. One is for AM chores (above it's in green) needing to be done before school and the other is for PM chores (above in black) to be done after school until bedtime. My kids are little so yes, I still need to remind them to eat breakfast and put on their shoes etc....but ultimately I could just have a stick that says "get ready for school" and it could encapsulate them all. When they've completed their chore, they move the stick over to the "done" jar.
I really want to make some optional star shaped or bright red sticks that help them to remember to be helpful to each other. Maybe something that says "Do something nice for your brother today" or "Hug your brother." Mine are so close in age they can use the gentle reminder one way or another.

Below are some close ups of the sticks. I've also written on them what the task is for my budding readers. The picture is nice for little ones who can't read or are very visual. These brown and green are for my oldest and the black and green w/red sticks are for my youngest.

These designs were cut on a cricut but you could just draw pictures, print them out on the computer, or cut them out of a magazine and they would work just fine. I modge podged them to the paper and then used glue dots to glue them to the stick.


Both kids have a set of jars that are decorated differently so they can tell them apart. Here are my youngest sons. His are done in sports theme. I wanted to cut out "to do" and "done" on the cricut but ran out of time and will probably add that later when I have more time. Then I will not need the little tags hanging down.


For the first few days I told them if they had all of their chores done and sticks moved over to the done side that they would get some sort of treat. A piece of gum or 25cents would do the trick! Love it when they are little and so easy to please.
Enjoy! Oh and I did these from left over Tastefully Simple Jam Jars which clean up beautifully. I modged podged the sports one but the other one I didn't I just wrapped it and used the modge podge to glue the edges together.
I had very cute paper picked out but the boys didn't like it and they wanted to pick their own paper so camo and sports is what it ended up being. Love this idea...Thank you Make it Sparkly Mama! She has some great ideas....check her out.


Layered Jello Squares

mmmm.....jello.....
Now that I got your attention...
Don't mind the mess on my kitchen island...which is my workstation for all things craft and cooking....so it pretty much looks like this all the time.

Here is the recipe for my layered jello squares. I had two recipes and didn't have the stuff for 1 recipe and the other had mixed reviews so I put them together and made my own. They set up nicely and got rave family reviews.
You'll need:

2 SM PKGS Lime Jello or 1 LG
2 SM PKGS Orange Jello or 1 LG
2 SM PKGS Red Jello or 1 LG
2 Envelopes Knox Unflavored Gelatin or 1 Envelope + 1 SM PKG Lemon Jello
1 CUP Sour Cream (Lite works)
7 CUPS Water

  1. Grease 9x13 pan with nonstick. Wipe excess off with a paper towel.

  2. Whisk 2 boxes of lime jello with 2 Cup Boiling Water. Place in the 9x13 pan and place pan in the refrigerator. Make sure it's level and let set for 30-45 minutes.

  3. While Green Layer is setting, begin making your white layer. It's important to start the next layer as soon as your current layer is setting so that it can cool down in time to be poured on w/out melting the last layer.


  4. Whisk 2 Knox unflavored gelatin or 1 Knox and 1 Lemon with 1 Cup boiling water. Then add the sour cream.


  5. As soon as the green layer is set, gently pour 1/2 of the white layer on top and let set another 30 minutes. Immediately begin making your orange layer.


  6. Whisk 2 Boxes of Orange Jello with 2 Cups boiling water. As soon as the white layer is set and your Orange mix has cooled just enough, pour gently on top of white layer and let set 30-45 minutes.


  7. Begin Making your Red Layer. Whisk 2 boxes of Red Jello w/2 Cups Boiling water and let set. Also reheat your white layer for about 20 seconds in the microwave so that you can easily pour it. If it is lumpy it will not pour well and it's difficult to flatten out.


  8. Pour the remaining white layer on top of the orange and let set for 30 minutes.


  9. Pour the last layer of red down and let set.


  10. Once totally set, you can slice into cubes and serve.

Notes:


  • I used sugar free jello and lite sour cream.


  • Set up times are approximate. You may get away with shortening the time but it's important that it's set up enough between layers so that the layers do not mix. You can test this by touching it lightly. It should just be a little sticky not watery.


  • And begin making your next layer as soon as you put the jello back in the fridge to set up.


  • You can of course use any color!